The Short Answer: Dry Rot Spreads. Catch It Early.
Dry rot repair in the Bay Area costs $800–$2,500 for a localized patch, $4,000–$12,000 when decay reaches structural framing, and $12,000–$30,000+ when it hits the band joist or mudsill. But the cost tier you land in is almost entirely determined by how early you catch it — not by the size of your home or the neighborhood you're in. Bay Area homes in the Sunset, Richmond, Pacifica, and Marin are among the most rot-vulnerable in California because of daily fog cycles, coastal salt air, and housing stock that predates modern flashing standards by half a century. Dry rot announces itself before it goes structural, if you know what to look for. Here's how to find it, what fixing it actually costs, and how to tell whether a contractor is solving your problem or burying it.
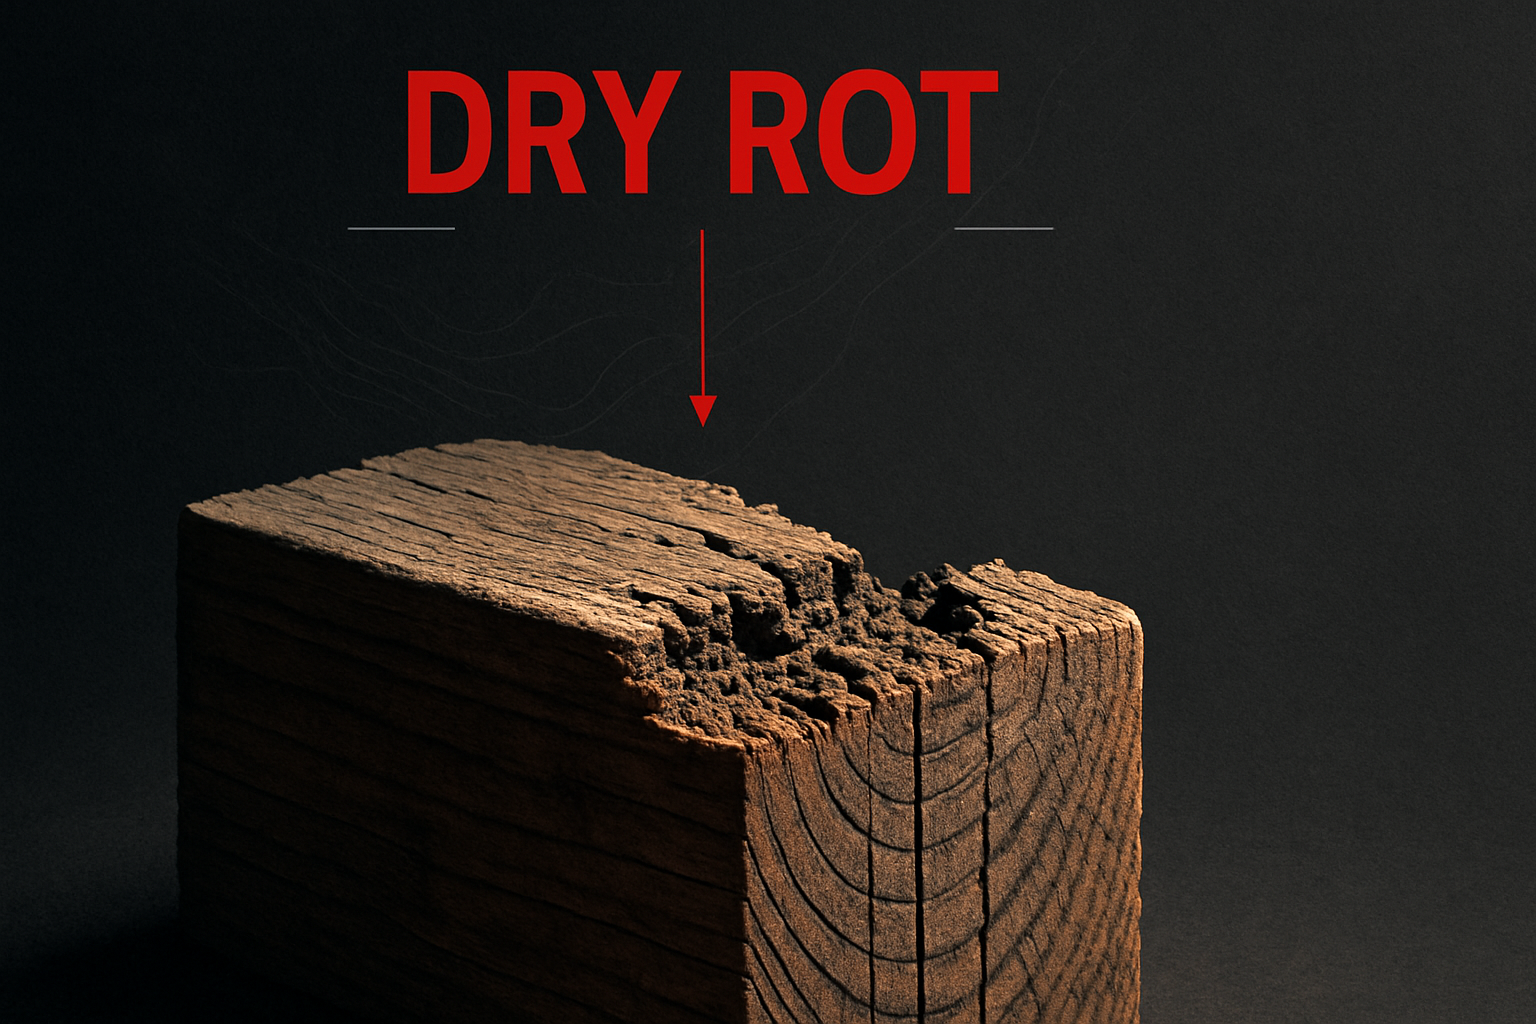
What Dry Rot Actually Is (Hint: It's Not Dry)
Dry rot is active fungal decay — a living biological process that eats wood from the inside out, not passive deterioration from age or weather. The name is misleading. "Dry" describes the crumbly, desiccated appearance of wood after fungal decay has consumed it — but the decay process itself requires moisture. Specifically, it requires wood moisture content above 20% sustained for extended periods. Below that threshold, the fungi responsible can't germinate. Above it, they thrive.
The organisms doing the damage are specific fungal species: primarily Serpula lacrymans and Meruliporia incrassata (wood-destroying fungi that break down the cellulose and lignin inside wood, extracting nutrients while leaving a hollow, crumbling shell behind). These aren't passive organisms. They're active biological systems, and they don't stop until the food source — your framing — is exhausted or removed.
As the fungi consume wood, they leave a characteristic pattern: a cuboidal crack structure, brown and crumbly, that collapses under pressure. The wood looks dry because the fungus has already finished with it. What you're seeing is the aftermath, not the active front.
The active front is wherever moisture is present. That's the piece most homeowners miss. You find the dry, crumbly damage in one spot and assume that's the extent of it. But the living fungal mycelium (the thread-like root structure that penetrates wood and spreads laterally) extends well beyond the visibly damaged area — often 6–12 inches into wood that still looks and feels completely intact.
This is why the standard dry rot repair protocol cuts back 6–12 inches past visible damage into healthy wood. You're not removing what looks bad. You're removing what the fungus has already colonized and hasn't finished consuming yet.
Why Bay Area Homes Are Uniquely Vulnerable to Dry Rot
The Bay Area climate creates conditions for dry rot that most of the country doesn't face — and that national product literature and generic contractor advice routinely underestimates. If you've been reading guides written for the Midwest or the Southeast, the risk calculus is different here.
Fog Belt Moisture (Permanent Humidity)
The Sunset, Richmond, Pacifica, and Marin coastal zones don't have a wet season and a dry season in the conventional sense. The fog season — June through September — delivers sustained ambient humidity that keeps exterior wood surfaces damp overnight and dries them only partially in the afternoon. That cycle, repeated 90+ consecutive days per year, pushes surface wood moisture content into rot-permissive territory without a drop of rain. Add the rainy season from October through April, and the window for wood moisture content below 20% is narrow. For homes with any compromised sealant, failed flashing, or degraded paint, it may not exist at all.
Coastal Salt Air (Accelerates Paint Failure, Exposing Wood)
Within roughly a mile of the bay or ocean — which includes Pacifica coastal home repairs, the SF Sunset and Richmond, and Sausalito hillside properties — airborne salt accelerates the breakdown of exterior paint and caulk. Paint that would hold on an inland Peninsula home for 8–10 years may begin to chalk, crack, and peel at year 5 on a Pacifica or Sausalito waterfront home. When paint fails, raw wood becomes directly exposed to fog-belt moisture. The transition from exposed wood to actively rotting wood in a coastal microclimate is a matter of months, not years.
Wind-Driven Rain (Water Where It Shouldn't Be)
The Bay Area receives less total annual precipitation than Seattle or Portland. What it does receive often arrives during atmospheric river events — extended high-intensity rainfall driven by sustained winds. Wind-driven rain penetrates siding joints, eave soffits, and window head trim from angles that gravity-fed rain doesn't reach. A window detail that drains correctly under normal conditions can admit water under sustained wind pressure, depositing it directly on unprotected framing behind the wall. On west- and south-facing elevations in San Francisco's fog-belt neighborhoods and along the Marin coast, wind-driven intrusion is the primary mechanism for water reaching structural framing.
Old Housing Stock (1900s–1950s, Pre-Modern Flashing Standards)
More than half of Bay Area residential housing was built before 1960. Pre-war construction in the Sunset, Richmond, and Berkeley predates kickout flashing (the metal diverter that directs water away from a wall where a roofline meets a vertical surface), weather-resistive barriers as a standard specification, and modern caulking compounds. These homes were built on the assumption that wood would be regularly maintained and repainted — and for decades, it was. A generation of deferred maintenance, owner turnover, and piecemeal repairs has left many of them with degraded or missing flashing, failed caulk at every trim penetration, and original tar-paper WRBs (weather-resistive barriers — the moisture barrier installed behind siding) that are decades past their service life. That's the dry rot setup. The fog belt and salt air are what activate it.
How to Spot Dry Rot: The 7 Signs
You don't need a contractor to find dry rot — you need 20 minutes and a flat-head screwdriver. Here's what you're looking for. Gadget Construction uses every one of these checks on initial dry rot repair across the Bay Area assessment calls.
1. Soft Wood (The Screwdriver Test)
The screwdriver test is the most reliable field diagnostic for dry rot. Take a standard flat-head screwdriver and press the tip firmly into any suspect wood — window sills, door jambs, fascia boards, deck ledgers. Healthy wood resists; the tip won't penetrate more than a millimeter or two without real force. Rotting wood is different: if the screwdriver tip sinks more than 1/8 inch into the wood without the wood splitting, the wood is compromised. If it sinks to the shank with hand pressure alone, you have active structural decay. Do this test at every wood-to-trim transition on your exterior walk-around.
2. Paint Peeling or Bubbling in Localized Areas
Paint that peels or bubbles in a single discrete area — not generalized weathering across the whole elevation, but one spot around a window or at a fascia corner — indicates moisture coming from behind. Moisture vapor moving outward through rotting wood pushes the paint film away from the substrate. The localized pattern is the tell. Whole-elevation paint failure is usually a maintenance issue. A six-inch bubble below a window corner is water intrusion. For context on how moisture-driven paint failure interacts with stucco exteriors, see our guide to cracked stucco diagnosis and repair in San Francisco.
3. Cubical / Cracked Pattern in Wood
Where you can see exposed wood — at peeling paint areas, at exposed trim ends, at a compromised fascia edge — look for a distinctive cracking pattern. Dry rot leaves behind a characteristic cuboid fracture structure: the wood breaks into roughly rectangular blocks along both the grain and across it, creating a pattern that looks like a dried-mud flat viewed from above. This is structurally distinct from simple weathering (which follows the grain) or impact damage (which is irregular). If you see this pattern, you're looking at fungal decay — and the extent of visible damage is the minimum, not the maximum.
4. Musty / Damp Smell (Especially Near Windows)
Active fungal decay produces a distinctive musty, earthy smell — the same smell as a wet basement or a pile of decomposing leaves. If you notice it near a window or exterior door on the interior, particularly after rain, that's the smell of live fungus. Pay attention to interior closets on exterior walls, the base of walls below windows, and built-in shelving units adjacent to exterior walls. The smell reaches interior spaces before visible damage does.
5. Visible Fungal Growth (White Strands or Orange Fruiting Bodies)
The mycelium of wood-destroying fungi is sometimes visible as white cotton-like strands spreading across wood surfaces in dark, damp areas — under decks, in crawl spaces, behind rotted trim. More alarming: visible fruiting bodies — mushroom-like growths, often orange or rust-colored, that appear when the fungus reaches the reproductive stage. Visible fruiting bodies mean the decay has been active long enough to complete a reproductive cycle. That's an emergency — schedule an assessment this week, not next month.
6. Sagging Floors or Ceilings Near Exterior Walls
A floor that sags or feels spongy near an exterior wall — particularly near a bay window or below a second-floor exterior — is a late-stage signal that decay has reached structural framing. Sagging floor near an exterior wall means rim joists (the boards that cap the floor framing at the building perimeter), band joists (the structural member connecting floor framing to the foundation), or subfloor sheathing have been compromised. This crosses from exterior repair territory into foundation-level wood rot and structural repair. It may also indicate the warning signs described in our post on foundation repair in San Francisco homes.
7. Stuck Windows or Doors Near Exterior Walls
Windows or doors that were previously operable and have become difficult to open — with no recent repainting, no visible swelling — can indicate framing movement caused by decay. When wood rots, it loses dimensional stability. A window rough opening that's shifted even slightly because framing has softened and compressed will bind the window in its frame. Many homeowners attribute this to settling or humidity for months before the rot is investigated.
Where to Look: The 10 Places Dry Rot Hides in Bay Area Homes
Walk your home with a screwdriver and a flashlight. These are the locations where Gadget Construction consistently finds dry rot on Sunset and Richmond repair calls, Daly City Doelger homes, Mill Valley hillside properties, and across the broader Bay Area coast.
1. Window Sills (Especially South and West Facing)
Window sills receive horizontal rain and direct UV on south and west elevations — the combination that degrades caulk fastest. When the sill-to-jamb caulk seal fails, water sits in the joint and wicks into end grain. Press your screwdriver into the sill ends (where the sill meets the jamb) and into the center. Check both interior and exterior sill faces.
2. Door Thresholds and Jambs
Thresholds take direct water contact every time someone enters from the rain. The gap between threshold and subfloor — or between threshold and exterior slab — is almost always an active moisture pathway on homes older than 20 years. Press the screwdriver into the base of both jambs at floor level. If it sinks, the decay is typically already in the subfloor or the bottom plate (the horizontal framing member at the base of the wall).
3. Fascia Boards and Eaves
Take a flashlight and look up into the underside of eaves — particularly at gutter attachment points and where roof meets wall. Fascia boards (the vertical boards at the roof edge to which gutters attach) are among the most commonly rotted exterior elements on Bay Area homes because gutters concentrate water directly against them. Any gap between the gutter back and the fascia face is a direct water intrusion point. Soft fascia means the rafter tails behind them are next. For related moisture issues above the roofline, see our Bay Area roofing services.
4. Roof Valleys and Kickout Locations
Where a roof slope meets a vertical wall — above a bay window, at a dormer, or where a porch roof ties into the main elevation — water concentrates. Kickout flashing (the metal diverter at a roof-to-wall junction) that's undersized, improperly lapped, or missing entirely allows that water to run directly into the wall assembly. Look at the siding or stucco immediately below any roof-to-wall intersection and do the screwdriver test at that point.
5. Deck Ledger Boards
The ledger board (the structural member bolted to the house that supports the outer end of a deck) is one of the highest-risk locations for structural dry rot on Bay Area homes. Water migrates down the deck surface, through the deck-to-house connection, and sits against the ledger and the rim joist behind it. Many deck collapses attributed to "age" were actually structural rot at the ledger. If your deck is older than 15 years and the ledger-to-house joint hasn't been inspected recently, add it to the list. Our guide to composite vs wood decking in the Bay Area covers why deck ledger vulnerability is one of the strongest arguments for composite deck systems.
6. Bay Window Bases
Bay windows are a documented failure pattern on Doelger homes throughout the Outer Sunset and Westlake in Daly City — and on Victorian and Edwardian homes across Pacific Heights and Alamo Square. The projecting base of a bay window collects water on its horizontal surfaces, and kickout flashing at the bay window roofline frequently fails with age. Press your screwdriver into the base trim of every bay window. Any give is a red flag. Check the interior corner where the bay meets the main wall — typically the last place to be painted and the first to retain moisture.
7. Behind Downspouts and at Gutter Outlets
Downspouts that discharge against the siding instead of cleanly away from the wall — or gutter end caps that have failed — concentrate water at a single point on the exterior. The siding behind a dripping downspout elbow takes years of concentrated moisture. Pull the downspout away from the wall slightly and look at the siding behind it. If it's dark and soft, assume the damage extends into the wall cavity.
8. Near Chimney Flashings
Chimney base flashing — where the chimney mass meets the roof — is one of the most failure-prone junctions in residential construction. Step flashing, counter flashing, and base flashing all need to remain properly lapped and sealed. When chimney flashing fails, water routes directly into the wall framing around the chimney penetration. Look at the siding and interior ceiling immediately adjacent to chimneys. Staining or soft spots near a chimney wall intersection almost always mean the flashing has failed.
9. Under Stucco at Foundation Level
Stucco that terminates close to grade — particularly on Doelger homes and 1940s–1950s tract construction throughout Daly City, the Outer Sunset, and Pacifica — can wick moisture from soil splash and grade-level contact directly into the wall system. If the weep screed (the termination detail at the base of a stucco system that allows trapped moisture to drain out) is blocked or missing, water backs up into the wall cavity. Look for efflorescence (white mineral salt deposits on the stucco surface), staining, or soft spots within 18 inches of grade. The relationship between stucco failure and underlying dry rot is explored in depth in our stucco diagnosis guide for SF homes and our comparison of exterior siding options for Bay Area homes.
10. Behind Siding at Kickout Flashing Locations
Anywhere a roofline or projecting element meets a vertical siding surface without proper kickout flashing, you have a water intrusion point. The damage is behind the siding where you can't see it — but the surface siding may be darker, slightly warped, or soft to the screwdriver test at those transition points. If your home has any location where a roof slope runs toward a wall and you can't clearly identify a flashing diverter at that junction, investigate it.
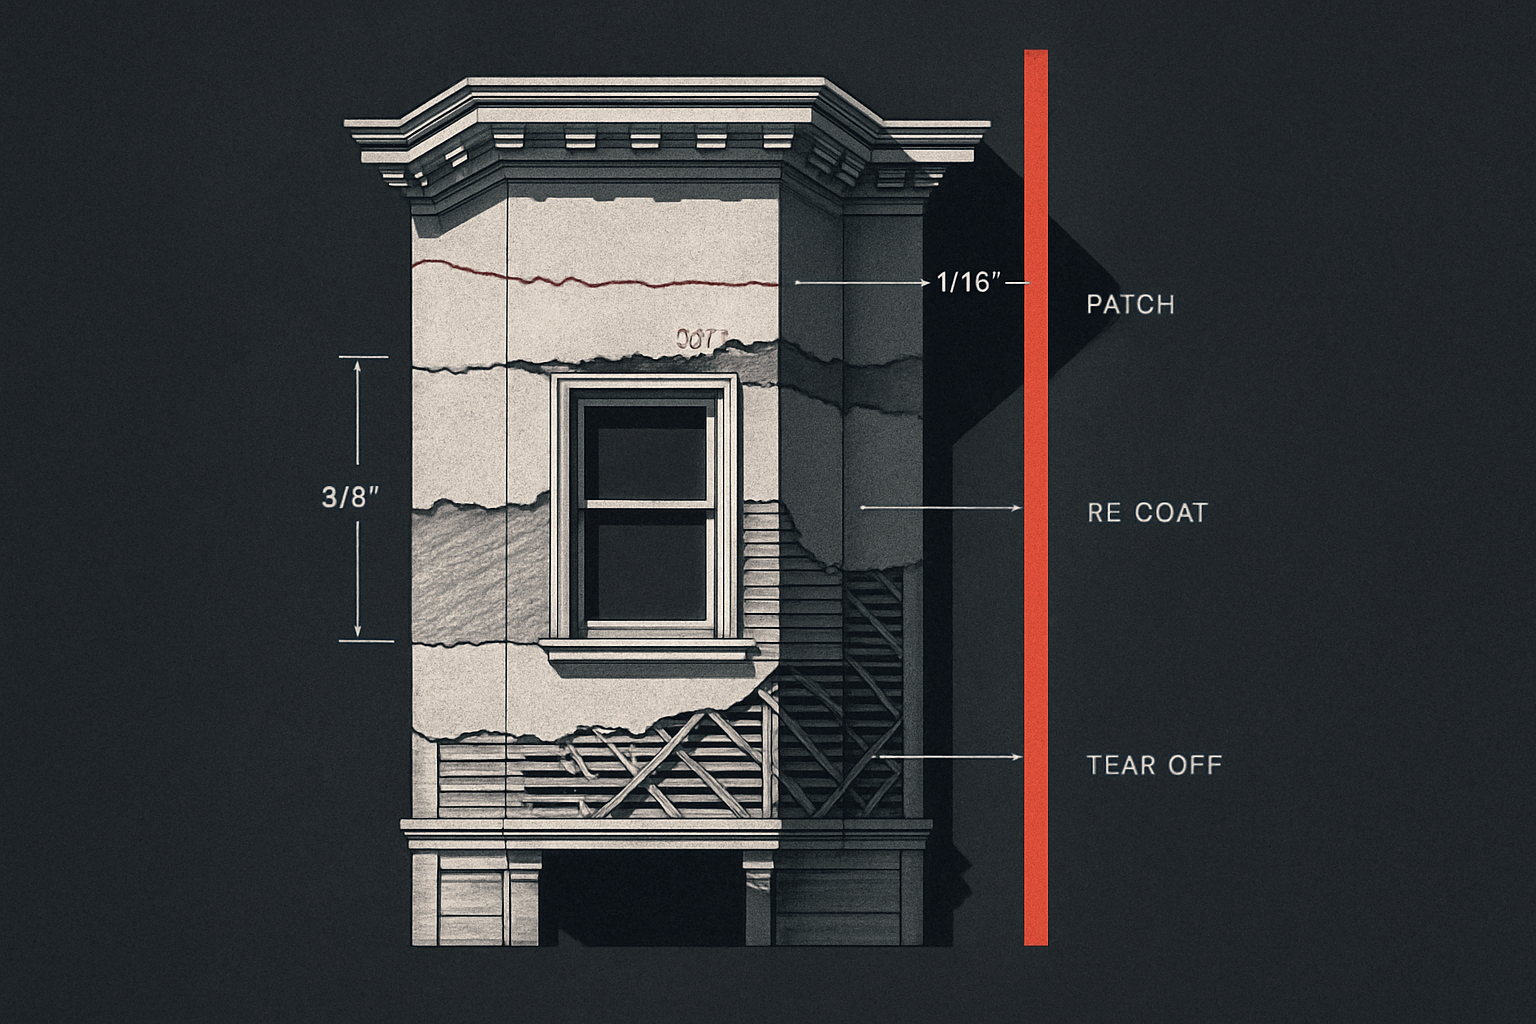
What Dry Rot Repair Actually Costs in the Bay Area
Dry rot repair cost in the Bay Area has a wide range — not because contractors price arbitrarily, but because cost is almost entirely driven by how far the decay spread before you caught it. Every year of delay on a localized repair typically moves it up one full cost tier. These numbers come from Gadget Construction's work across 500+ Bay Area projects, not national averages.
Localized Patch (Single Window or Trim Piece): $800–$2,500
One rotted window sill, a single door jamb, an isolated fascia section. The decay hasn't reached structural framing — it's confined to finish trim or non-structural sheathing. The scope: remove rotted material, cut back to healthy wood, replace with new trim or sill stock (typically clear-grade cedar or pre-primed finger-jointed alternative), apply new flashing or sealant at the water source, prime and paint to match. Timeline: 1–2 days. This is the repair you want to catch before it becomes the next category.
Whole-Wall Dry Rot and Sister-Framing: $4,000–$12,000
The decay has reached the structural framing behind the trim — typically studs, sheathing, or the framing around a window rough opening. Sister-framing means installing new lumber alongside (or replacing entirely) compromised structural members. This scope includes opening the wall, removing all affected framing, installing new pressure-treated or kiln-dried lumber, replacing sheathing and WRB, re-flashing the water source, and reinstalling siding and trim. On a Doelger home with shiplap sheathing, discovering structural rot behind a bay window typically lands in this range. Budget a 10–15% contingency on any wall-opening repair — what you find when the wall is open is never exactly what the surface inspection suggested.
Structural (Band Joist, Rim Joist, Foundation-Adjacent): $12,000–$30,000+
Decay has reached the structural elements at the building perimeter — the band joist (the framing member that ties the floor system together at the exterior), the rim joist, or the mudsill (the pressure-treated board that anchors the framing to the foundation). This is where a $2,000 delayed repair becomes a $20,000 rebuild. The scope involves working at the foundation level, potentially requiring temporary shoring while structural members are replaced, and full exterior reconstruction at the affected elevation. These repairs require permits — SF DBI (the San Francisco Department of Building Inspection) requires a permit for any structural framing work, and so do most other Bay Area jurisdictions. Rim joist repairs that look like one failing span are often three or four spans when the wall is fully opened. Add 15–20% contingency minimum. For foundation-adjacent work, see our concrete foundations and structural repair service.
| Repair Tier | Scope | Typical Cost | Timeline |
|---|---|---|---|
| Localized trim / sill repair | Single window, door jamb, or fascia section | $800–$2,500 | 1–2 days |
| Whole-wall with sister-framing | Structural framing behind cladding | $4,000–$12,000 | 3–7 days |
| Structural / foundation-adjacent | Band joist, rim joist, mudsill | $12,000–$30,000+ | 2–4 weeks |
What Bad Contractors Do (And Why the Rot Comes Back)
The dry rot repair call-back is one of the most common situations we're brought in to assess — homeowners who had "repair work" done 2–3 years ago and are looking at the same damage in the same location, or worse. The patterns are consistent.
Painting over soft wood. The fastest way to fail a dry rot repair is to paint over wood that's already compromised. The paint hides the evidence for one season. Moisture continues to wick through the soft wood underneath, the fungus continues to consume it, and by the following year the paint has peeled again — from a larger area, deeper into the wall.
Bondo or wood filler as a primary repair. Epoxy wood fillers (sold under names like Bondo and PC-Rot Terminator) have a legitimate role as part of a repair — specifically, filling small voids in wood that has been cut back to healthy material and is structurally sound. They are not a substitute for removing and replacing rotted wood. A contractor who fills a soft sill with epoxy filler without first cutting back to healthy wood has not repaired the rot. They've capped it.
Caulking gaps without replacing wood. Running a bead of caulk over a cracked window sill without probing the sill for rot beneath is a cosmetic touchup that traps moisture against the rotted wood and accelerates decay in the sealed cavity. Caulk is a sealant for sound materials. It doesn't perform rot remediation.
Patching siding without checking framing. Replacing a rotted fascia board without inspecting the rafter tails behind it. Re-siding a wall section without pulling back the WRB to check the sheathing. These shortcuts generate repeat calls. The framing and sheathing behind rotted cladding have been exposed to the same moisture source for the same duration. Assuming they're fine because you can't see them is optimistic in exactly the wrong direction.
Not fixing the water source. This is the most consequential failure. If the kickout flashing that allowed water into the wall in the first place isn't replaced, any repair to the damaged wood is guaranteed to fail. Water re-enters through the same path, deposits against the new framing, and restarts the decay cycle. Repair lifespan without fixing the water source: 2–3 years, not 20. The water source is always the first fix — everything else is downstream of it.
The Bay Area Dry Rot Repair Process: How to Do It Right
The process isn't complicated, but every step has to happen in the right order. Skipping steps is how the other contractor generated the call-back you're now trying to fix. Gadget Construction has completed dry rot repairs across the SF Sunset, Pacifica's Linda Mar and Rockaway Beach, and the Marin hillside towns of Mill Valley and Sausalito using this sequence on every project.
Step 1: Find the water source. Before any wood is removed, the moisture pathway is identified. Failed kickout flashing, a blocked weep screed, a compromised gutter attachment, cracked caulk at a window head — the source is located, documented, and included in the repair scope. If the water source isn't fixed, nothing else matters.
Step 2: Remove ALL affected wood. Cut back 6–12 inches past the visible decay margin into structurally sound wood. The fungal mycelium extends beyond what's visibly damaged. Cutting to the visible damage line leaves active biology in place. Sound wood resists the screwdriver test — that's the cutback line.
Step 3: Inspect framing and sheathing behind. Once cladding is removed, every structural member in the affected area is probed. Sheathing, studs, rim joists, and band joists are checked before anything is rebuilt. What you find at this step sets the final scope. This is where contingency budgets get used.
Step 4: Sister-frame or replace structural members. New pressure-treated lumber (for any framing in contact with concrete or at ground level) or kiln-dried dimensional lumber (for above-grade framing) is sistered alongside or used to replace compromised members. This is the only correct structural repair — epoxy fillers don't restore load capacity.
Step 5: Install new WRB. New weather-resistive barrier — Grade D building paper or a vapor-permeable housewrap product — is installed over the repaired framing. Upper courses overlap lower courses so water sheds down and out, not into the wall cavity.
Step 6: Install new flashing at the water source. Kickout flashing, window head flashing, step flashing — whatever failed to allow the water intrusion is replaced with correctly dimensioned, correctly installed metal. On Pacifica coastal home repairs and Sausalito hillside dry rot projects, we spec stainless or aluminum flashing — standard galvanized steel corrodes in 8–12 years in persistent coastal salt air.
Step 7: Replace siding, stucco, or trim to match. The exterior is closed with matching or upgraded materials. Coastal homes get materials and fasteners appropriate for salt-air exposure. Where original shiplap sheathing is found wet and compromised on Doelger homes, we replace it with plywood sheathing for longevity. For homes where siding material choice is on the table, see our guide to stucco vs Hardie Board vs wood siding for Bay Area homes.
Step 8: Prime and finish. All new wood gets primed before installation, not after — including cut ends. Field-priming after installation misses the end grain, which is the highest-moisture-uptake surface on any wood member. The finish coat goes on after the assembly is complete, not as a substitute for proper substrate prep.
Frequently Asked Questions
How much does dry rot repair cost in the Bay Area?
Dry rot repair in the Bay Area costs $800–$2,500 for a localized trim or sill patch, $4,000–$12,000 when decay has reached structural framing behind the cladding, and $12,000–$30,000+ for foundation-adjacent structural repairs involving the band joist, rim joist, or mudsill. Cost is driven almost entirely by how far the decay has spread before it's caught — not by home size or neighborhood.
How do I know if I have dry rot without calling a contractor?
The screwdriver test is the most reliable DIY diagnostic: press a flat-head screwdriver tip into any suspect wood. If it sinks more than 1/8 inch without the wood splitting, you have rot. Also look for localized paint bubbling, a cuboid cracking pattern in exposed wood, and musty smell near windows or exterior doors. These signs are detectable months or years before decay goes structural.
What's the difference between dry rot and wet rot in Bay Area homes?
Dry rot is caused by specific fungal species — primarily Serpula lacrymans and Meruliporia incrassata — that can spread mycelium through masonry and across non-wood surfaces, making it far more dangerous than wet rot. Wet rot stays confined to the wet wood itself. Both require moisture above 20% wood content to activate, but dry rot spreads aggressively beyond the original moisture zone. In the Bay Area fog belt, both occur, but dry rot poses the greater structural risk.
Does dry rot repair require a permit in San Francisco?
SF DBI (the San Francisco Department of Building Inspection) requires a permit for any structural framing work, including replacement of band joists, rim joists, mudsills, or studs. Localized cosmetic repairs — replacing a window sill or a fascia board without touching structural framing — typically don't require a permit, but the threshold varies by scope. When in doubt, ask your contractor to confirm permit requirements before work begins.
Why do Doelger homes and Victorians in San Francisco get dry rot so often?
Both housing types were built before modern kickout flashing, vapor-permeable housewraps, and marine-grade sealants were standard practice. Doelger homes (built 1930s–1950s across the Outer Sunset and Westlake in Daly City) typically have shiplap sheathing and original tar-paper WRBs that are decades past their service life. Victorian and Edwardian homes in the Mission, Noe Valley, and Pacific Heights have decorative trim with dozens of caulk joints that fail progressively. Add the fog belt's persistent humidity and you have near-ideal conditions for fungal decay.
Can I just use Bondo or epoxy wood filler to fix dry rot myself?
Epoxy fillers like Bondo are only appropriate as a finishing step after rotted wood has been fully cut back to healthy material. They restore appearance — not structural capacity. Filling a soft window sill with epoxy without removing the decayed wood traps moisture against the active fungus, accelerating decay in the sealed cavity. For any repair involving structural framing, epoxy filler is not a code-compliant or safe substitute for lumber replacement.
How long does dry rot repair take?
A localized trim or sill repair typically takes 1–2 days. Whole-wall repairs with sister-framing run 3–7 days. Foundation-adjacent structural repairs involving rim joists or mudsills take 2–4 weeks, depending on scope and whether permit inspections are required. Note that wall-opening repairs frequently reveal more damage than the surface inspection indicated — build time and budget contingency of at least 10–15% into any scope that involves opening a wall.
Ready to Know What You're Actually Dealing With?
Seeing any of the seven signs above on your home — or a location on the 10-hiding-places list you've never actually inspected? The screwdriver test takes 20 minutes. What you find may be nothing. Or it may be the difference between a $1,500 sill repair and a $15,000 framing rebuild.
Gadget Construction provides free dry rot inspections with written findings and photos across Sunset and Richmond dry rot repairs, Pacifica coastal homes, Mill Valley, Sausalito, Oakland, Berkeley, and all 31 cities we serve. We identify the water source, map the full extent of decay, and give you a fixed-price estimate — not a scare-tactic sales pitch and not a vague range padded with allowances. CA License #1132983. 12+ years. 500+ Bay Area projects. 5-year workmanship warranty in writing on every scope. Schedule your site assessment through our contact page or learn more about our full approach to dry rot repair across the Bay Area.